Basic Wiring Guide
Contents
[hide]Introduction
Improperly or carelessly installed wiring systems can be potentially dangerous and may result in damage to the robot and electrical components. When assembling a SuperDroid robot, the following information is what we have found to be the best wiring practices.
Wiring
Color
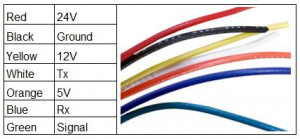
Pick a wire color scheme and keep it consistent throughout the entire project. Write down what each of the colors represents so that when you have to troubleshoot, you know what each of the wires is, and what it should be doing. Sticking to consistent wire colors also helps you isolate power wires from signal wires.
Routing
When working from a schematic, it is easy to tell where a wire begins and ends, but it doesn’t give you information on where to run the wires. Before starting the wiring process, it is best to mechanically assemble the robot and note where there might be a rotating part (shafts, sprockets, gears, and chains) and where any pinch points or sharp edges might be. Avoiding these problem areas will help keep the wires free of cuts or getting ripped out of the components.
When starting to wire a robot, it is easiest to run the power and ground wires first. Cut off more wire than you think you need and run the wires through the chassis making sure to avoid the problem areas mentioned above, sharp bends in the wires, and outer edges of the robot.
If you find that you need to power several components off of one battery or voltage source, consider using terminal blocks, or a power distribution board. The terminal block will allow you to distribute power to all of the components without having to splice wires together or run multiple wires from the same source.
For complicated systems, it is often a good idea to connect all the ground wires to a single ground point. This ground point can either be the negative terminal of the battery, or a ground lug bolted to the robot chassis. By connecting all of the ground connections to the same point, you reduce the risk of creating a ground loop in the system.
One way to reduce noise in the robot is by physically separating the signal wires from the power wires. If you have space, consider running power down one side of the robot, and signal wire down the other side. If you are still getting unwanted noise after that, try running the signal wires perpendicular to the power wires.
Wire Management
Securing loose wires within the robot chassis will lessen the risk of a wire getting snagged, pinched, or pulled out. Bundling wires together with cable ties is often the only solution needed to keep wires from turning into a mess of spaghetti. However, if you want to make sure the wires are completely secured, using wire tie-downs is another good option.
Another option for securing wires inside of the robot is with cable and wire tie-downs. A quick google search will give you an overwhelming assortment of cable tie-downs that you can use for the project. Some are designed for quick and easy access to cables, and others provide a more permanent solution to mount the wires. One quick way to hold down wires is with square cable tie mounts. These mounts have a sticky pad that will mount on to the chassis and have a slot in them for a zip tie to go through. For a more permanent hold, consider using the wire clamps which you can bolt to the chassis and secure the wires with a zip tie.
Twisting wires into a single twisted pair will also help keep the cables organized and reduce electrical noise in the system. When choosing which wires to twist together, be sure to only twist similar wires together i.e. power and ground, or two signal wires.
An easy way to twist wires together is with an electric drill. Insert both ends of the wires into the drill chuck, keeping both the wires taut, hold the opposite end of the wires and turn on the drill.
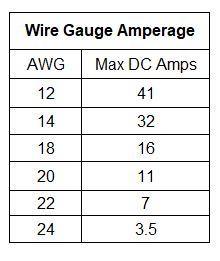
One option when running multiple wires from one component to another is to use multi-conductor cables. These cables on average hold anywhere from 2 to 8 wires and can be used to carry signal or power between components. However, care needs to be taken to make sure that the gauge of the wire is the appropriate size for the task at hand. Sending too much current through too small of a wire will result in the wire burning up, or limited current.
Noise Mitigation
The best way to reduce electrical noise in a robot is to have a plan. By using the right wire or cable, and running the wires appropriately, you can reduce the amount of noise in the system. For simple robots, mainly RC controlled robots with 2-4 motors and a motor controller, noise usually isn’t a problem. However, adding more components like microcontrollers, servos, and encoders, the amount of noise can increase and adversely affect the robot. Thankfully there a few things we can to do reduce noise in the robot.
- Shielded cable is a great way to reduce noise. Using shielded cable for the motor leads, or using a shielded cable for the data wires can protect the signals inside the wire from picking up unwanted signals.
- Ferrite beads can also help eliminate unwanted noise. Adding a ferrite bead to each of the motor leads can knock out a good amount of electrical noise.
- Twist the power and ground wires together to create a twisted pair.
- Adding a capacitor to the motors.
- For signal wires, make sure the wires are the same length.
- For more reading on reducing nose see our Motor Wiring Guide.
Another way to reduce noise in the robot is by physically separating the signal wires from the power wires. If space is available, consider running power down one side of the robot, and signal wire down the other side. If the unwanted noise continues, try running the signal wires perpendicular to the power wires.
Switches, Fuses, and Other Power Considerations
Always have a switch on your robot!
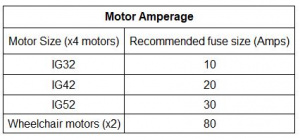
Before selecting a switch, determine the max amperage that your robot will draw. It is better to err on the side of caution and get a switch that can handle the spikes than to get a switch that will handle the average current. These values are listed on the motor datasheet, but if you are using our motors, below is a handy table for the average current draw from each of our motor configurations.
For your own safety and the safety of the robot, the first thing that comes off the positive battery lead is a fuse, and then a switch. The fuse will protect from an overcurrent situation, or from a shorted component that draws a large amount of current from the battery. Placing the switch directly after the fuse will helps to make sure that the wires going to the components will not be energized when the switch is in the off position. Keep in mind, that even though the circuit is interrupted when the switch is off, anything hooked up in between the switch, and the battery can still be considered energized, and if touched to a ground source (especially if the chassis is grounded) can create a short circuit.
WARNING: Don’t even think about touching anything in the robot until you have confirmed with a multimeter that the components are de-energized and safe to handle.
Adding a fuse or breaker to the robot is a cheap way to protect the robot. Short circuits are a big issue when it comes to the robot, passing that much current through the system can either ruin or reduce the lifetime of the components. An Automotive Fuse, or a Glass Fuse is a great way to protect the robot. These fuses have a small piece of metal inside them that is designed to overheat and break if the current is too high, severing the connection and essentially acting as a single-use switch. The single-use fuses are a great inexpensive option for the robot.
Component Placement
Knowing where to place each component is another important factor when wiring the robot. Placing components too far apart from each other can result in long wires snaking through the robot increasing the chances of one of those wires picking up noise. On the other hand, placing certain components too close to each other can make it hard to wire, troubleshoot, and in the case of RF equipment, increase the noise in the robot. Another thing to consider is whether you have a device that you need to program with a USB cable or other programming cable. If you do need to program or troubleshoot with, give yourself extra room to insert, and take out the USB cable (Trust me on this one, I have wired up more than a few robots thinking I had enough space, only to realize I forgot about the USB cable).
One final note on component placement is something you might not want to hear but will help you in the long run. Attach each of the components knowing that you might have to remove that component someday. Components can break, burn up, or just magically stop working, so having the ability to take that component out easily, might just stop you from wanting to bang your head against the wall.


